
Muy buenas.
Soy Myry de Fils et Papiers.
El verano está a la vuelta de la
esquina, así que qué mejor manera de preparar las vacaciones que
con un Travel Book o cuaderno de viaje.
Hello everyone!
Here is Myry from Fils et Papiers.
Summer will be here before you know
it, so how better to celebrate it than make a Travel Book.

No será la idea más original pero os
aseguro que esta idea os va a gustar, sobre todo si no conocéis el
trabajo de Евгения Типикина (@evasafo) el cual
recomiendo que veías.
It will not be the most original
idea but I assure you that this idea you'll like it, especially if
you don't know Евгения Типикина's works (@evasafo). I
recommend you see her works a lot!
Vamos a necesitar:
-La colección de papeles "Sea Time"
-1 hoja A3 de acetato o 1 funda para
pocket letter
-2 imanes, 4 eyelets y crop-a-dile,
goma elástica, papel de acuarela, foam adhesivo y cinta engomada
-Tarjetas "Sea Time - Bowline(Silver foil)"
-Ephemeras "Sea Time –Expedition"
-Herramientas para cortar, plegar,
pegar y para entintar los bordes, máquina de coser, troqueladora de
bordes, cinta de color azul marino, esquineras metálicas y elementos
decorativos como enamel dots, troquelados...
Supplies that you will need:
-A3 sheet of acetate or one pocket
letter sleeve
-2 magnets, 4 eyelets and
crop-a-dile, rubber band, watercolor paper, adhesive foam and kraft
paper tape
-Tools for cutting, folding, gluing
and inking the edges, sewing machine, large edge punch, navy ribbon,
metal corners and some embellishments like enamel dots, die cuts...
¡Empezamos!
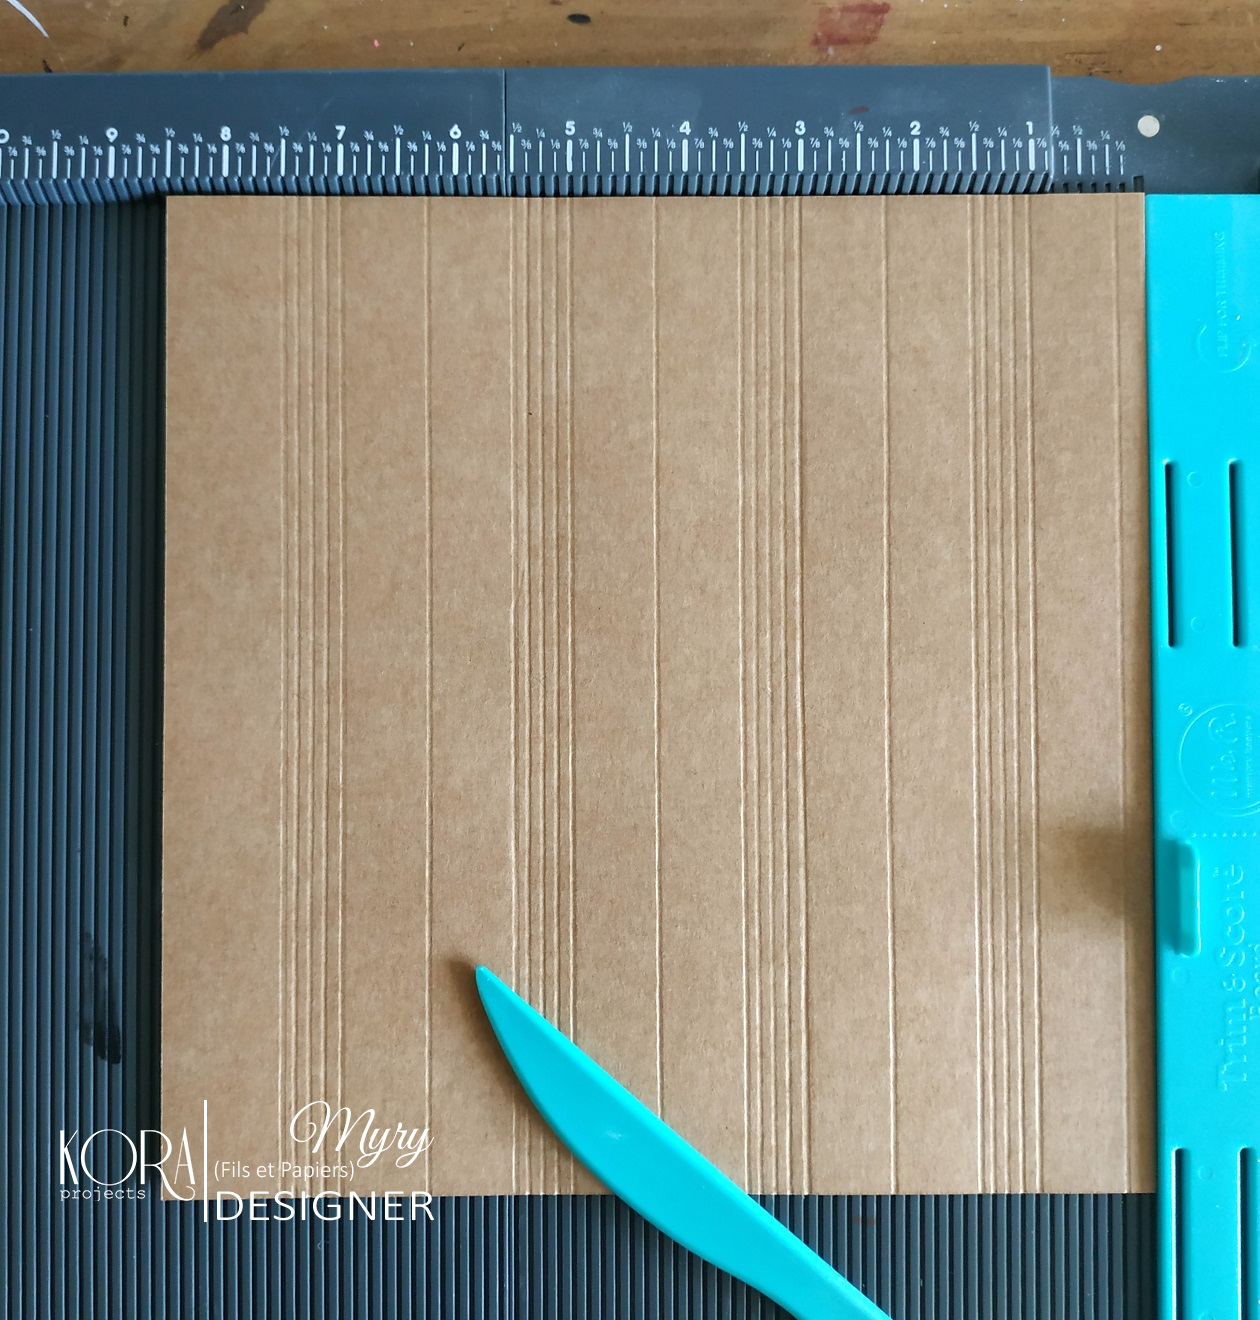
Lo primero que vamos a hacer es la
espina.
Para ello usamos un trozo de cartulina
kraft de 21'7x22cm (8 1/2"x8 11/16") y plegamos a:
Let's start!
So first we are going to do the
spine.
Use a cardstock piece of 21'7x22cm
(8 1/2 "x8 11/16") and score and fold to:

También vamos a marcar cada 1/8"
(3-4mm) pero dejaremos estas marcas sin plegar.
Score every 1/8 " (3-4mm) too
but not fold them.

Recomiendo tener acabadas las hojas
(decoración incluida) antes de hacer la espina pero en esta ocasión
vamos a hacerlo así.
Y seguimos con las páginas y los
bolsillos.
I recommend doing the spine once the
leaves are finished (decoration included) but this time let's do it
this way.
And now let's make the pages and the
pockets.

Para las páginas usamos tres trozos de
cartulina kraft de 22'5x29cm (8 7/8"x11 7/16") y las
plegamos a 14'95cm y a 15'35cm (5 7/8" y 6") de manera que
un costado quede más corto que el otro.
For the pages use three cardstock
pieces of 22'5x29cm (8 7/8"x11 7/16") and fold them at
14'95cm and 15'35cm (5 7/8" and 6") so one side will be
shorter than the other.

Para los bolsillos usamos tres trozos
de 15x25'5cm (5 15/16"x10 1/16"), aunque yo he decidido
hacer uno más pequeño.
For the pockets use three pieces of
15x25'5cm (5 15/16"x10 1/16") although I've decided to make
a smaller one.

Pegamos cada uno de los bolsillos a las
páginas de la siguiente manera:
Glue the pockets to the pages in
this way:

Al pegar el bolsillo mirando hacia la
derecha creamos una abertura por la que pegar la espina.
If you glue the pocket looking to he
right you create an aperture through which to glue the spine.
Lo siguiente que vamos a hacer son dos
libretas un poco más pequeñas que las páginas.
Necesitamos hojas de papel y dos
papeles de la colección "Sea Time".
Yo voy a usar "Overland" y
"Ocean friends".
Let's continue making two notebooks
a little smaller than the pages.
Use paper sheets and two papers of
"Sea Time" collection.
I'm going to use "Overland"
and "Ocean friends" papers.

Podéis encuadernarlas como queráis.
Yo he trazado una línea vertical por el centro y luego he pasado la
máquina de coser por esa línea.
You can bind them as you want. I've
drawn a vertical line through the center and then I've sewn that.
A continuación vamos a hacer un sobre
con un papel de scrap de 30'5x30'5cm (12"x12"). Yo voy a
usar la propia portada de la colección "Sea Time".
Os dejo esta imagen para que os hagáis
una idea de la forma y tamaño.
Now make an envelope with
30'5x30'5cm (12"x12") scrap paper. I'm going to use the
cover of the "Sea Time" collection.
I leave this image to give you an
idea of the shape and size.

Es importante que el ancho del sobre
sea igual o un poco más pequeño que el largo de la espina, puesto
que vamos a coser un lateral del sobre a un costado de la espina.
Cortamos un trozo de papel de acuarela
y lo pegamos como en la foto, por la parte del sobre que va cerrado
(no lo peguéis por donde se abre) y trazamos una línea vertical
justo por donde se dobla el sobre.
It's important that the width of the
envelope is equal or slightly smaller than the length of the spine
because we are going to sew one side of the envelope to one side of
the spine.
Cut a piece of watercolor paper and
glue it as in the photo, on the part of the envelope that will be
closed (don't glue it where it opens) and draw a vertical line just
where the envelope is folded.

Una vez seco vamos a situar nuestra
linea vertical justo en la primera marca al final de la espina y
cosemos por ahí.
Once dry put the line just in the
first score at the end of the spine and sew there.


Vamos a hacer algo parecido pero con la
hoja de acetato o, en mi caso, una hoja para pocket letter.
Pegamos un trozo de papel de acuarela a
un trozo un poco más grande de cartulina (el largo debe ser igual al
de la espina), y cosemos por encima de la línea sobre la última
marca del inicio de la espina (lo mismo que hemos hecho con el sobre
pero dándole la vuelta a la espina).
We're going to do something alike
with the acetate or, in my case, the pocket letter sleeve.
Glue a piece of watercolor paper to
a little larger piece of cardstock (the length should be equal to
that of the spine), and sew above the line on the last score of the
beginning of the spine (the same than we've done with the envelope
but turning the spine).

Pegamos el acetato con un pegamento que
no lo deforme ni deje marcas.
Si usas la hoja de acetato crea un
bolsillo doblando la hoja y pégala de igual manera.
Glue the acetate with a glue that
doesn't deform or leave marks.
If you use the acetate sheet, create
a pocket by folding the sheet and glue it in the same way.

Una vez tengamos ambos extremos
terminados podemos fijar la espina...
Once both ends are finished you can
set the spine...

...y una vez esté seca podemos pegar
las hojas y decorarlas.
...and once it's dry you can glue
the pages and decorate them.

Ahora haremos las tapas.
Para ello usamos dos trozos de cartón
gris de 16x22'5cm (6 5/16"x8 7/8"); quedan algo grandes en
comparación con las páginas, así que si queréis quitarle algún
centímetro a lo largo podéis hacerlo.
Para el lomo usamos un con trozo de
cartulina kraft de 10'5x22'5cm (4 1/8"x8 7/8") pero si
tenéis papel de acuarela mucho mejor. Hacemos dos marcas a 2'3cm y a
8'3cm (7/8" y 3 1/4") y marcamos todo el interior cada 1/8"
(3-4mm) tantas veces como sea necesario para poder darle forma
cilíndrica a la espina.
Now we'll make the covers.
Use two cardboard pieces of
16x22'5cm (6 5/16"x8 7/8"). They're a bit bigger compared
to the pages, so if you want to take a few inches along, you can do
it.
For the spine use a cardstock piece
of 10'5x22'5cm (4 1/8"x8 7/8") but if you have a piece of
watercolor paper much better! Score at 2'3cm and 8'3cm (7/8" and
3 1/4") and fold the inside every 1/8" (3-4mm) as many
times as necessary to give a cylindrical shape.

Para cerrar el Travel Book vamos a
hacer un cierre con imán.
Hacemos una marca a una distancia de
2'8cm (1 1/8") del borde y colocamos el imán para poder trazar
su forma. Usamos estos dos chipboards del "Set de Viaje"
para hacer dos ventanas y reservamos el del globo terráqueo para el
cierre.
To close the Travel Book we're going
to make a magnet closure.
Make a mark at 2'8cm (1 1/8")
from the edge and put the magnet to trace its shape. Use these two
chipboards of "Travel Set" to make two windows and reserve
the globe for the closing.

Cortamos...
Cut...

...colocamos el imán en su sitio y lo
fijamos con pegamento y cinta engomada, tanto por delante como por
detrás. Luego pegamos el lomo por fuera de las tapas.
...put the magnet in its place and
fix it with glue and kraft paper tape at the front and back. Then
glue the spine outside of the covers.

Una vez seco, podemos empapelar o
entelar la tapas.
Once dry use paper or fabric for the
covers.

Yo he usado los papeles "Mediterranean
spirit" y "Destination unknown".
I used "Mediterranean spirit"
and "Destination unknown" papers.

Para cubrir las tapas por dentro vamos
a hacer dos bolsillos con dos hoja de papel de scrap de 16x22'3cm (6
5/16"x9 3/16").
Para hacer un doble bolsillo cosemos
por la mitad el bolsillo más pequeño al bolsillo que va debajo.
Make two pockets with two scrap
paper of 16x22'3cm (6 5/16"x9 3/16") for the inside of the
covers.
To make a double pocket sew in half
the smallest pocket to the pocket that goes underneath.

Dejamos estos dos bolsillos a parte y
pegamos la espina al lomo.
Leave these two pockets apart and
glue the spine.

Presionamos bien entre las hojas y al
margen de la espina con la ayuda de la plegadera.
Una vez seco hacemos dos agujeros en
los dos únicos espacios grandes que quedan entre las páginas
teniendo en cuenta el alto de las libretas que hemos hecho
anteriormente.
Press hard between the pages and the
margin of the spine with the help of the bond folder.
Once dry make two holes in the only
two large spaces between the pages. Take care when you make the
holes, measure the height of your notebooks to avoid mistakes.

Colocamos los eyelets y pasamos la goma
elástica de la siguiente manera, empezando y acabando por la
derecha:
Put the eyelets and pass the rubber
band like that (starting and ending on the right):

Hacemos un nudo de manera que puedan
entrar las libretos pero no salir fácilmente.
Make a knot so that the notebooks
can enter but not come out easily.

Antes de pegar los dos bolsillos vamos
a acabar el cierre.
Cortamos una tira de cartulina kraft de
3'5x15cm (1 3/8"x5 15/16") y la colocamos en su sitio con
la ayuda del imán y del chipboard.
Before gluing the two pockets finish
the closing.
Cut a strip of 3'5x15cm (1 3/8"x5
15/16") cardstock and put it in place with the help of the
magnet and the chipboard.

Una vez sabemos dónde va a ir,
marcamos y plegamos a partir de 5cm (2") en adelante pero sin
llegar al final. Podemos forrar la tira con un trozo de papel de
scrap o de lo que hayamos usado para forrar las tapas.
When you know where to put it score
and fold from 5cm (2") henceforth but without arrive to the end.
You can cover the strip with a piece of scrap paper or whatever
you've used for the covers.

Volvemos a marcar y plegar, y damos
forma cilíndrica a la tira.
Score and fold again and give it a
cylindrical shape.

Cosemos un extremo de la tira a la
contraportada...
Sew one end of the strip to the back
cover...

...y en el otro extremo pegamos encima
de la tira el otro imán, asegurándonos de que realmente va a cerrar
sin problemas.
...and glue the other magnet on the
other end to the strip making sure that the close works without
problems.

Rodeamos el imán con foam adhesivo
para nivelar la superficie y poder pegar el chipboard.
Surround the
magnet with adhesive foam to level the place and to glue the
chipboard.

Y por fin pegamos los dos bolsillos que
nos quedaban y decoramos la portada.
And finally we can glue the two
remaining pockets and decorate the cover.

¡Y éste es el resultado!
And this is the result!


Espero que os haya gustado y os animéis
a hacer vuestro Travel Book.
I hope you liked it and encourage
you to make your Travel Book.
Aquí podéis ver el vídeo del final:
No hay comentarios:
Publicar un comentario